Introduction
Do you know that a superuser or root password holder has complete control over the system? Yes, the superuser holds the root password and the power to modify files, install software, and manage users.
A root password is set during the installation of the operating system or when the root user account is created. Before we start reading this article on root password settings, it is important to note that this password is not shared with different people.
Now get ready to discover all the steps to change or reset the root password in Linux-based operating systems.
Changing Your Root Password in Linux
We will learn to change the root password Linux-based operating system, Linux, through the following steps.
- Launch the terminal window through Ctrl+Alt+T or by searching the terminal on the application menu.
- Once the terminal window is launched, simply type “sudo -i” to log into the root user account. You will have to enter your login details here.
- After you have successfully logged in to your root user account, type “passwd” in the terminal window. Enter the new password when asked.
- A message will appear on your screen, which will state that the password has been changed.
- Simply log out of your root user account by typing ‘exit’ on the terminal window.
Resetting a Root Password in Linux
You need to know the difference between changing and resetting before you learn to reset the root password on Linux. A reset is done when the password is lost and the account is no longer accessible. On the other hand, the password is changed when the user wants to get a new password while he has access to the root account. Follow the below steps to reset the root password on Linux
- First of all, you need to start your Linux system by pressing the power button.
- Your system will naturally start the boot process when you press the power button. Now you need to hold the shift key to access the GRUB menu.
- The GRUB menu simply means ‘Grand Unified Bootloader’. This menu displays all the advanced boot options.
- Moving forward, you need to select the recovery mode option from the advanced options for Linux.
- Now you have to enter the root shell prompt ‘root drop to root shell prompt’ inside the recovery menu.
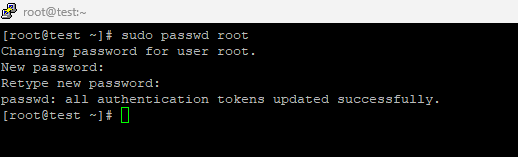
- You will require read and write mode as you need to reset the root password on Linux. The system’s recovery mode is default set to only read mode. Simply run the below command to perform the function.
mount -o remount,rw /- Now with the help of this command, ‘passwd root’, you can reset the password.
- When you have successfully reset the root password on Linux, you will have to reboot the system through the command ‘reboot’.
- The system will restart.
Changing the Root Password in CentOS
Changing the root password on CentOS is quite similar to the process on Linux. Follow these easy steps to quickly complete the process.
- As usual, you need to launch the terminal window through Ctrl+Alt+T, or you can simply go to the application menu and search for the terminal.
- When your terminal window is launched, you will have to switch to the root user account through the ‘sudo su -‘ command.
- Now simply run the ‘passwd’ command on the terminal to change the root password
- You will now need to enter your new password and press enter.
- This process will be complete with a message on your screen stating that the password has been changed.
- You can now exit the root user account by entering the ‘exit’ command on the terminal.
Also Read: Linux sed Command: From Basics to Advanced Usage
Reset Root Password in CentOS
In a similar fashion to the process we used for resetting the root password in Linux, we will now proceed to follow the necessary steps to reset the root password in CentOS.
- Start your CentOS system through the power button.
- Access the GRUB menu by repeatedly pressing the Shift or Esc key.
- Once the GRUB menu is open, simply click on the CentOS entry.
- Now you will have to press ‘e’ to edit the boot parameters.
- To easily modify the boot parameters, simply locate the line that starts with “linux16” or “linuxefi” and append “rd.break” to the end of the line. Then, confidently press Ctrl + X or F10 to boot your system using the newly modified parameters.
- To enter the emergency shell, the system will give you a read-only root filesystem. To make it read-write, use this command.
mount -o remount,rw /sysroot- Use this command to switch to the sysroot directory.
chroot /sysroot- Simply utilize the ‘passwd root’ command to reset the root password.
- The final step is to type in the desired password, and that’s it; you have successfully reset the root password centos command line.
- You can now restart your system.
Also Read: How to Change a Directory Using the cd Command in Linux?
Conclusion
Changing or resetting the root password in Linux-based operating systems like Linux and CentOS is of utmost importance for security and administrative purposes. The root password provides superuser privileges and complete control over the system.
To modify the root password in Linux or CentOS, you need to follow certain steps. Firstly, open a terminal and log in as the root user or use the “sudo” command. Then, execute the “passwd” command to set a new password. Once you have confirmed the password change, you can log out or exit the root user session. It is crucial to keep the root password secure and share it only with trusted individuals who require administrative access to the system. Ensuring the usage of strong and unique passwords and keeping them updated regularly can also enhance the security of the system.